Showing posts with label Creative Expressions. Show all posts

Tuesday, 8 August 2017

Ribbon Storage - Vintage Style!


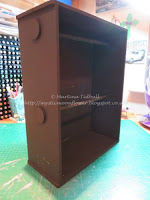
Hello all! I am still organising and this time it is the turn of my ribbon stash (or at least some of it!) This unit is again from Stamps Away (Clevercut), and is available in different configurations. This one is a double loose ribbon rack. I have also purchased a 'Reel Wheel', but have not decorated this yet!

As usual, the unit came flat-packed and was very easy to put together. As before, I used decorators' filler to fill the joins in the MDF, sanded it back where needed and made the edges even and smooth.
The next step was to paint the entire unit with black gesso and let dry. I then drew on one of Andy Skinner's brilliant techniques using hair clay: I added some to the areas I wanted to be able to expose later on (the clay will stop the top layer of paint I use from sticking down).

With the clay in place, I then painted the entire unit again, this time with DecoArt Chalky Finish Paint in Lace. I also painstaking painted each of the ribbon holders with the same colour (this was the worst bit!)


Now to decorate! I used the border from PaperArtsy Stencil PA050 across some of the edges to tie them all in, some of the wording from PS049 and the 'Paris France' logo from a Creative Expressions Stencil. I used Relic DecoArt Chalky Finish for the stencilling, as this gave a nice dark, but not black, effect.


With the stencil detail in place, I was then able to experiment with some of the gorgeous 7 Gypsies 'Inspire' Parchment Rub-ons. I cut out lots of the sewing themed images and text and then randomly applied them all over the unit. 


Once I started applying the images, I realised that there was going to be quite a few areas that would be peeled away, so I took a cloth and then rubbed all over the unit until the areas with wax underneath were exposed. I then finished adding some more rub-ons and also stamped a few sewing themed images with Archival Ink.


There we have it, one finished ribbon storage holder! I am really pleased with it, even though I know most of the decoration won't be seen, I know it's there!
Thanks for reading,
Martina
xxx



Thursday, 12 January 2017

Starlights on Fabric - A Present for Me!!!

I decided to transform a boring old pen wallet into something more to my taste using Imagination Crafts Starlights Paints this week. Here is a little snippet...


To see the full post on the Lisa B. Designs Blog, click HERE!

See you soon!


Tuesday, 18 October 2016

A Winter's Scene - Frosted!


A quick post from me today, a card that I had a picture of in my head, but it was not the same picture as what I eventually created!! I started with some very plain background paper (it had a blue wash) and then stamped some of the snowflakes from the Hobby Art Winter's Snowflakes set. I stamped in Tumbled Glass, Denim and Vintage Photo Distress ink, using the first and second generations of ink. I also stamped some snowflakes in Versamark and heat embossed with white detail powder to add some variation and texture. Using the same ink colours, I distressed the outside edges of the paper to bring the eye in. To create the 'land' area at the front of the card, I tore a piece of the same backing paper as before and distressed the top torn edge to make it stand out. I also added a few snowflakes and stamped a sentiment from the Hobby Art Christmas Frosting Set.
Next came the scene arrangement. I die-cut some trees from craft card and added some Vintage Photo highlights. Using the waste as a stencil, I added some trees to the background of my scene giving some depth. The sleigh and the deer are both Sue Wilson dies, both cut using craft card once again with added highlights (I added some cream card on the reverse of the deer).
To add some 'frosting' to my card as my sentiment says, I used my finger to apply some Diamond Sparkle Medium onto the sleigh, trees, ground and deer. There are also a few tiny pearls in the centre of some snowflakes.
Voila!

Saturday, 11 July 2015

A Wedding Present and Memory Piece

In the same vein and theme as my previous card, I also wanted to make something for my friend which would last a little longer. I used the same colours and set about making something 'arty'!The base shapes are 2 large MDF hearts from Indigoblu which I have based with Indigoblu white Gesso. I have then mixed by own acrylic paint until I achieved a lemony colour. Still not happy with that, (as it looked a little flat) I took a chance and added a layer Daler-Rowney Interference Shimmering Gold. Instant shine and variable tones! Once dry I have used a script stamp to stamp across both hearts horizontally with Colourbox Ochre ink. The script has then been heat embossed with clear powder. At this point I wanted to add another element to the background, but I admit I was stuck as to what and how. I tried using a range of silver/grey inks, but all appeared to dark or too light! In the end, and quite by accident, I had a go with stamping the Indigoblu Small Flourish stamp in Colourbox Charcoal ink straight onto one of the hearts. Thinking it too dark, I went to wipe it off with a baby wipe, but was then in a panic when a grey echo of the stamp remained! Taking a step back, I realised I liked the effect...
Before adding the top layers of decoration, I wanted to add more texture to the heart and make it more 'vintage'.I decided to add some Inka Gold all around the piece as a whole for a distressed and 'non-perfect' look. Next I wanted to weave together some flowers and gems to create a bouquet along one edge. This took quite some time to get right, but I was happy with the final effect. The lemon flowers were easy enough to find, but I had to create the greyer ones by adding light grey ink to ivory flowers. I also decided to make my own decorative pins using coloured beads and crystals just to add a few interesting touches. Once the flowers were mounted I have used strings of Hobby House pearls across both the hearts. On top of this, I have used Spellbinders Ornate Oval dies to cut and mount a picture of the happy couple (taken from social media) and a sentiment that I love from Lavinia stamps at the top. The date was printed from Serif CraftArtist and cut using a Bigz die (Estate). The final touch was a set of charms (wedding themed) hanging from a bow. The ribbon is yellow seam binding from Creative Expressions along with some organza ribbon from my stash. To present the gift I had to make a box, print a name panel and cut 4 corners from a Tattered Lace die. I was worried that my work was a little old-fashioned, but I'm pleased to advise it was liked!


Saturday, 18 April 2015

Hobby House Wedding Couple

This is a card I have made for a friend's wedding. I have used a 7x7 pearl card blank for the base and added a craft card layer. On top of this is have used papers from First Edition pad 'Isabelle'. All the layers on the card have had the edges distressed with Tea Dye Distress Ink. Across the middle of the card I have added 2 layers of Duchess Lace from Creative Expressions. The main topper is from the Hobby House Sylvia Zet collection - 'Love Me Do'. I have cut the image out using Spellbinders dies Labels Two and also created a matt with the same dies. There are 2 panels behind the topper and these have been created using more papers from the First Edition pad and cut with Scalloped Labels One. They have been matted onto Decorative Labels One shapes cut from craft card. At the top and bottom of the card I have edged the paper with a gorgeous cream woven style ribbon. The flowers and pearl pins were from my stash; I have picked colours from the main image and built it all up from there. The little sentiment is from Craftwork Cards and the foliage has been created using Tattered Lace dies. Again, a box is needed for this one!

Saturday, 5 July 2014

Friendship with Elizabeth Bennett

I love Jane Austen's works and sometimes it is lovely to get lost in novel such as Pride and Prejudice, no matter how many times you have read it! IndigoBlu made this beautiful portrait stamp of Elizabeth, and it is a pleasure to work with. I decided that I wanted to work with only one 'colour' and shade parts of images with lighter and darker tones. I have stamped and embossed Elizabeth with detail powder and then used Spellbinder Opulent Ovals to cut her out and to provide a background shape behind her. The floral panel has been made using a Creata stamp, again embossed with detail powder. The paint is a Cosmic Shimmer H2O colour. The sentiment is also from IndigoBlu and is part of the 'Enjoy Life' plate. The pearl swirls are from Creative Expressions.

Saturday, 17 May 2014

A Pirate Pencil Pot!

Being in the mood for some more altered art, this time my youngest asked for me to make him a pencil pot for his bedroom. Being pirate themed, I had to scrabble about in my stash to find whatever I could with this theme in mind. The actual pencil pot is a basic shaped one bought from the MDF man at Ali Pally. I decided to use pale blue acrylic paint for the base colour in and out. I then found some Papermania paper, 'Ahoy There!' to be my side panels. Each panel I tried to do something different with and therefore used a mixture of stamps from Hobbycraft and Creative Expressions, as well as some nautical themed papers that were free from a magazine some time ago. The stamps were stamped directly on the papers and coloured with Promarkers. The anchor I decided I wanted to be more 3D, so I stamped it on card, cut it out and wound some coloured jewellery wire around it. The bottle was filled with sand and glued on with a hot glue gun, as was the metal key. The chest I cut out and embossed, then made this more 3D by shaping it and using some Pinflair to attach it. The same idea was applied to the skull and crossbones. Finally I used some silver jewellery chain and attached some metal charms from my collection which all fit the theme. At each corner at the top if the pot I used a hot glue gun to attach the chain, and covered this with a flat metal silver brad. I am pleased to say he liked it, especially as there were lots of tactile elements.


Friday, 7 March 2014

Ooh La La!

 
                                                                               This is the card I made for my husband for his birthday. I bought these fabulous Vintage Lingerie stamps from Creative Expressions a while ago, and wanted an excuse to use them! The card size is 8x8" with matted and layered craft card, as well as black and burgundy card. The background paper was made using a stamp reading 'Ooh La La!' over a piece of card distressed with Scattered Straw and Vintage Photo distress ink. The words were randomly stamped in the Vintage Photo, with both first and second generation inks used. The main bodices were all stamped on white card and coloured with Promarkers. The top left has black pearl detail down the middle and a piece of pink lace ruched at the back to create gathers. The top right bodice has had black lace added to the base and top, and I have pierced holes down the centre sewing red baker's twine into a laced pattern. The final bodice has pink lace ruched at the front and a paper rose in the middle. Each bodice has been layered onto embossed craft card and the sentiment I made up and printed from the computer. The final paper rose was from my stash and the co-ordinating corners were cut using Spellbinders D-Lites Corner Flourish dies. The card has loads of texture in real life and although it was fiddly, I am quite pleased with the results.


Wednesday, 27 November 2013

Trying To Keep It Simple...

This time I wanted to try and make an 8x8 card, but keep it simple. I do have a tendency to love adding lots of layers, yet I really admire those wonderful cards that are clean and simple. For this card I wanted to keep the colour choice minimal. I have created some background layers using plain white and craft card. The top layer consists of one third craft card, stamped with a holly stamp I got free with a magazine and then gold heat embossed. The rest of the front has an embossed white panel created using the Embossalicious Mistletoe Moments folder. The message stamp is the from Die'sire Mistletoe Kisses Sentimentals range, again gold embossed onto a Labels Thirty Two shape and layered onto a Vintage Label Three shape. The shiny flowers have been cut on pearly red paper using Spellbinders Layered Poinsettia dies, which I have then applied Versamark through, taken the die away and added pearly gold mica powder. So soft, but I like it! The pearls and ribbon are from Creative Expressions.

Friday, 4 October 2013

Beautiful Belles!

This stepper card was made using the Creative Expressions 'Belle of the Ball' plate. The dress images are so detailed that I did not want to fiddle with them too much, so I decided to simply emboss them. All the stamps used here are from the plate, including the corners and sentiments! I was asked to make some prom cards this year; I think this is a great plate to use!

Thursday, 5 September 2013

Style Divas!

 These two cards were made for two friends of mine who are very stylish and chic. They also love vintage things, so I thought I would have a play with some Creative Expressions stamps that jumped into my basket at the last craft show...
The dress form and sentiment stamps are all from the same collection. They have been stamped using brown archival (black in the card below) and then embossed with clear powder to give a lovely sheen. I have used Cosmic Shimmer dark Bronze PVA glue to add the dots to the sides of the image. The top card features 2 embossed panels separated with sparkly brown ribbon and a cameo I made using UTEE, coloured embossing powders and a mould. The feather has been die cut using Spellbinders Jewel Fantasies and the pins are from Creative Expressions as well. The card below features some Kanban Mackensie cardstock with an embossed panel to the top. The black buttons have been tied with raffia and some black lace has been threaded with plain ribbon.

Saturday, 31 August 2013

Layering Spellbinders

This card was inspired by Julia Watts from Creative Expressions. I do not often use lots of Spellbinders shapes layered together, but seeing Julia do it, I thought I would give it a go! The main colour was chosen as it was for a lady who loves purple. I started with white card stock and distressed using Milled Lavender and Dusty Concord Distress Inks. I then randomly stamped a flourish stamp I have from Hunkydory. The darker purple panel has been embossed using a Couture Creations embossing folder and edged with lace. The die cut flourishes have been cut using a Tim Holtz Sizzix Bigz die (elegant flourish) and coloured using the same inks as before. The main sentiment is from LOTV and has been layered several times with Persian Spellbinder's dies, Lacey Circles and Basic Circles. The flowers are from my stash. I have used decoupage pads to add some height, so it is quite a fat card!

Saturday, 3 August 2013

First Prom

 These cards were made as I was asked to make a card for an 11 year-old to celebrate her first prom! It needed to be cream and black with a dress on... the perfect excuse to order some more Spellbinders' dies! These are shapes from the dress forms dies and have been layered on some fantastic Kanban cardstock (I think the collection was called Mackensie).  I have also used neutral cardstock from my stash to make the die cuts pop. The layering shapes are Spellbinders shapes (petals, jewelled fantasies) with some small punched flowers from matching card. The ribbon is from Creative Expressions and the gems from my ever-growing stash!

Saturday, 6 July 2013

A 'Cracking' Vintage!

This card was made using stamps from Rubbernecker Stamps (Creative Expressions). I have made my own background paper using a wine label stamp and some Tim Holtz Vintage Photo ink (also used around the edges). The black panel has been clear embossed with the same image. The foremost topper has been stamped with a wine bottle stamp and triple embossed with UTEE. I then placed into the freezer for a short time to allow it to cool down, before bending it to get the 'cracked' vintage look. The sentiment stamp is from the same range by Creative Expressions. The flowers are from Kanban and the raffia has been added to create a 'posh' wine bottle feel!

Saturday, 29 June 2013

Getting Better With Age!

This card was made as part of a request; I needed to make a men's birthday card with a 'wine' theme. I happened to pop some Rubbernecker stamps (Creative Expressions) into my basket at one of the Ali Pally shows, so they were perfect for this theme! I have used Kanban backing paper to add interest and then layered with co-ordinating card mounting using Spellbinders Labels dies through my Big Shot. The colours were all done using Distress Inks - Vintage Photo, Peeled Paint, Scattered Straw and a touch of red from a Cat's Eye red pad I had. The ribbon is some of the 'vintage ribbon' Sue Wilson uses. 

Saturday, 22 June 2013

Mermaid fun!

Although my blog has been a little quiet of late, I promise I have been busy! I do need to post more regularly though... This is the card I made for my husband's birthday using stamps I bought at the Ali Pally show from Creative Expressions. I have stamped the scene masking as I went, and coloured using Promarkers. The tail of the mermaid has been glittered using lots of Stickles. It is quite liberating doing funny cards; I may have to add to this range...

Friday, 7 June 2013

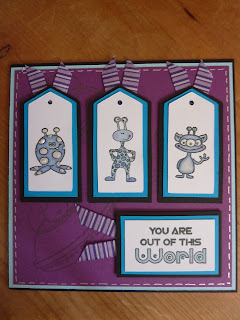
Alien fun!

Love these guys; smiling aliens! These fellows are from Creative Expressions. There are lots of alien themed stamps and accompanying images to enhance them. I have chosen 3 of the characters to be my toppers and also used a sentiment from the range as well as a large ship stamp to use in the background. The men have been coloured in shades of blue using Promarkers and their features highlighted using pale blue and white highlights using Liquid Pearls. This was made for a 7 year-old's birthday. I had lots of fun with these; the beauty with aliens is that there are no rules!

Friday, 19 April 2013

Beautiful Elizabeth Bennett

 Here is a gorgeous stamp I recently purchased from the Ali Pally show framed on a piece of altered art. Lisa Baker inspired me to have a play and this is my first independent go with this kind of art and I am already hooked! The hearts are from Indigoblu as well as the main stamp itself. I have also used one of their fantastic flourishes for the background and a sentiment from a Creative Expressions stamp plate. I have used a large pink and small pink ribbon from my stash to hang it all (stuck together) and also some pastel roses.
The hearts have been initially based with gesso and then covered in acrylic paint (I mixed to a colour I liked). Once dry I have coated the hearts in PVA glue, let this dry and applied a thin layer of Indigoblu's Kroma Crackle. I have dried this with a heat gun for quickness and a soft crackle effect. Once all set I have stamped Elizabeth onto tissue paper and placed her on the main heart with a layer of PVA to seal. I have stamped the flourish around for interest using a raspberry Adirondak, and also added colouring detail to the flowers in her hair with shades of the same colour (using a water brush). I am really pleased with the effect and it has
inspired me to alter all sorts of things! Indigoblu has also inspired me a lot lately, I love their products and the 'Englishness' of the images.

It seems less restrictive to create something in this way, the rules simply aren't there and you can make something to your own taste. Here's to many more creations...

I am going to enter Miss Bennett in the latest Indigoblu challenge Forever 21 challenge 3 - flowers (have just discovered they do one!).

Friday, 21 October 2011

Monkeying Around!

I made this card for my son's 3rd birthday this year. He particularly likes monkeys at the moment so I experimented with some Rubbernecker /Creative Expressions stamps. The images have been coloured using Promarkers and the middle is a Creative Expressions embossing folder used on Core-dinations paper and sanded. The number 3 has been cut and mounted using the Cricut Storybook cartridge.
Powered By Blogger