Showing posts with label Cricut Storybook. Show all posts

Saturday, 28 June 2014

Memory Books for a Friend

Ok, it has been some time since my last post, but I have been busy on what turned out to be a mammoth project! I had a small MDF book with metal book rings. I had the idea that for my best friend's 30th birthday, I wanted to make something for her, other than a card. As we have known each other all our lives, I thought a memory book would be fun to put together in a few pages. Several hours and days of photo hunting later, I had found so many memories that I knew I was going to need more space. The few pages I had planned doubled. Then I needed more space again, and so one project became two books in the end!

If I had planned it properly beforehand, I would have certainly used a 12x12 book, but hey, we live and learn... Anyway, here are some of the pages that I made to celebrate 30 years of friendship, dodgy hairstyles, dubious fashion choices and memories of events past. I managed to organise them in some chronological order so that the books made sense, right up to the present day.

All the papers used were from a First Edition paper pad called 'Sweet Owl' along with some matching pain cardstock. The photos were cut using a range of Spellbinder basic shapes and D'Lites dies. All the other phrases, words, flowers and emblems have been using my Cricut Expression. My Cricut was a Godsend for this project, as it gave me pages of elements very quickly and I could manipulate text using the Design Studio. The main cartridges I used were Storybook, Type Candy Font, American Alphabet, Cindy Loo and Cricut Essentials.
I gave the books to my friend at her surprise 30th birthday party and she really liked it. I am sure however that there were a few cringe moments with some of the photos...!
Overall, it was a project that took far longer than I had envisaged, but I really enjoyed making it for a very special friend.


Friday, 18 October 2013

Birthday Lovely Lili!

Morning all! This stamp is definitely getting a good run! Again, I love this girly from LOTV, (called Summer Lovely Lilli) and here I have used lots of shades of pink to complement her and make the ultimate, flowery, girly card! I have used my Cricut Storybook cartridge to cut the basic topper shape and again to matt. I have also used the same cartridge to cut some decorative corner flourishes and another, smaller shape to add dimension and layers. The flowers and buttons are from my stash and the papers are from the First Edition Dreamcatcher pad. The main image has been coloured with promarkers and the sentiment has been stamped using a Popcorn sentiment (I think!) As this month's theme for the LOTV challenge blog is 'Anything Goes', I thought she would be perfect to enter!

Saturday, 17 August 2013

I wonder what she is wishing?

Here is one of those lovely LOTV girlies again (Summer Lovely Lillies)! I have changed colours this time, choosing turquoise as my main focus colour. The background paper is from DCWV and I have added some white embossing. The main image has been stamped onto Neenah card and coloured using Promarkers. I have added some tiny gems to the centre of the flowers to make them pop a little. The base topper shape is a basic shape cut using the Cricut Storybook cartridge, as are the corner embellishments. The raffia, gems and skeleton leaves are from my stash, and the 'Wish' ticket is from Tim Holtz Adage Tickets.

Saturday, 10 August 2013

Imagination is the key...

This is a 6x6 card made as a result of me playing with a few techniques. I started with plain white cardstock and lightly distressed all over with some Tim Holtz ink. I then stamped on this randomly using an Indigoblu Flouish stamp in a second generation of the same ink. Finally, I stamped again using the same flourish, this time embossing with Stampendous Frantage powder (amazing stuff!). The powder has white, blue and gold in which gives lovely texture and interest. The brown swirls are a Tim Holtz Sizzix Bigz die and the flowers have been cut using my Cricut Flower Shoppe cartridge. The fairy and mushrooms (Lavinia) were stamped into an image cut from a Cricut Storybook shape. Again I have used 2nd and 3rd generations of ink here, with the fairy being embossed with glittery powder. The text is from Tim Holtz mounted on a Spellbinders D-Lites shape.

Saturday, 18 May 2013

Beautiful Lili of the Valley girly!

Hi there, I have been a little quiet on the blog front this month, as I have been a busy bee working on a mammoth project in celebration of my 10th Wedding Anniversary! I have been sorting, organising and ordering 10 years worth of photos! These are then rapidly becoming a 40 page scrapbook as a present for my husband. I have never done scrapbooking before, so 40 pages with 10 different themes I think may have been a tad ambitious; but hey ho!
I have made a couple of cards though, and this lovely girly has inspired me for one of them. I know a lot of people don't like the missing features on these type of images, but I really like this one from LOTV. She is clearly happy! Both the sentiment and main image are from LOTV, the card from Hunkydory, flowers cut using Marianne Dies, and the rest of the bits and bobs are from my stash. I have coloured her with Promarkers.

Saturday, 5 May 2012

Wordbook for a 30th Birthday!

This was a request for a work colleague; guess what the occasion was! This is a wordbook made using my Cricut Storybook cartridge and the new Cricut Craftroom online tool. It took a while to get the layering right though! I have used Distress Ink to add depth and the papers are from the MCS Tinkering with Steampunk CD Rom. Each page also has quotes and details from the CD which were appropriate for the theme.

 The internal pages had blank sections for people around the office to put their comments in!
I had to make a box to finish it off, again I have used letters from the Cricut cartridge and layered with shapes from it as well. The cogs are from a Tim Holtz Sizzix Originals die.

Friday, 21 October 2011

Monkeying Around!

I made this card for my son's 3rd birthday this year. He particularly likes monkeys at the moment so I experimented with some Rubbernecker /Creative Expressions stamps. The images have been coloured using Promarkers and the middle is a Creative Expressions embossing folder used on Core-dinations paper and sanded. The number 3 has been cut and mounted using the Cricut Storybook cartridge.

Tuesday, 11 October 2011

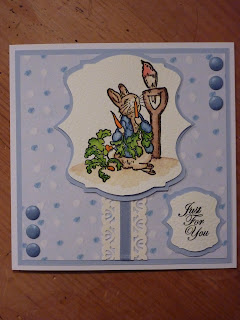
Peter Rabbit

 Once again I feel I may be avoiding the Christmas cards...not sure why! I have been experimenting with Aquamarkers and different watercolour papers for these cards. I have now come to the conclusion that you get what you pay for! I have used Dayler Rowney papers here, cold pressed with that lovely texture. I have used the Cricut Storybook cartridge to cut the shapes and borders used. I think I am getting better with the Aquamarkers now, but it does take practise! The papers have come from Crafter's Companion Cute Companion CD roms (original collection and Summer Stories I think!).
I have kept them simple I know, but I suppose the feature is really meant to be Peter!
This one is a slighty larger version and I have added some Card Candi and also some paper stamped both sides with an edger punch.

Hope you like them...any ideas let me know!

Magical Birthdays

These are two cards I have made purely because I can't seem to get in the mood for making Christmas cards yet! I have used Papermania fantasy backing papers, a sentiment stamp from Lili of the Valley and stamps from Lavina to create the scene - yes even fairies do washing! The shaps have been cut using the Cricut storybook cartridge and the tiny silver flowers using a Pinflair multi-punch. There is glitter all around the fairies and unicorn, but the camera has not picked this up very well! Hope you like them xx

Wednesday, 24 August 2011

Flower Fairy Magic

This is a card made with the Crafters Companion flower fairy range. The stamp used is from the 'Wild Cherry' stamp plate. There are 2 sizes on the plate and I have used the largest one here. She has been coloured using watercolours. The background has been cut using the Cricut Storybook cartridge. She has been finished with glittery wings and pearls. Hope you like her!

Saturday, 2 July 2011

Celebrate and Bake!

This card has been made using a Lili of the Valley stamp that is so cute! The shapes have been cut using the Cricut Storybook cartridge. I love this stamp, it covers so many occasions and by changing the colours you can create a whole new feel! The image has been coloured using Promarkers.

A wizard birthday card for my son


This is a card I made for my son's birthday. I have used stamps from Woodware and also one other that was from my stash (can't remember where it was from!). The images have been coloured with promarkers and Adirondack inks. The numbers and the shapes have been cut using my Cricut (Storybook cartridge). Hope you like it; my son did!
 

Tuesday, 7 June 2011

Lili of the Valley Fairy with Cricut Frame

This is the same fairy holding a star, but this time I have used a Cricut background shape and then layered this for effect. I have also tried my hand at adding some flowers but the arranging of them seems to take practise!

Tuesday, 31 May 2011

Fairyopolis Fairy Card

I have just made this card for my daughter's 7th birthday - she loves fairies so much! This is another of those gorgeous stamps from the Fairyopolis range, I think she is called Harebell, but please correct me if I'm wrong! She looks so adorable and I love the butterflies that come on the stamp sheets to.

Again I have used Promarkers, along with a Cricut Storybook border, phrase and background shape.

Perhaps some more glitter is needed? Although the mint card is glittered (I know the photo's not great!).

Fairyopolis Flower Fairies - Daisy

This is Daisy, one of my favourite fairies from the new Crafter's Companion Fairyopolis range. I have coloured her with Promarkers and then lightly glittered her wings. I have also distressed the edges of the background shape, which is cut using the Cricut Storybook cartridge - my favourite and the most useful cartridge. I have used some flowers and Pinflair glue to help me keep them on - I'm learning!

Hope you like her, I think I need to practise blending the Promarkers a little more and also try some more colours; I have just been bought some more for my birthday!
Powered By Blogger