Showing posts with label MDF. Show all posts

Saturday, 10 February 2018

A JOFY Inspired MDF Ink Rack - Funky Flowers in Bloom!

Good morning all!

I am finally getting around to decorating some of the MDF storage dotted around my room, and with my latest ink rack I decided to go 'JOFY'. 

The basic rack is from Clevercut (Stamps Away) and came flat-packed. I assembled the rack and then base coated the edges with some pale blue paint. I then took a large sheet of watercolour card and measured 4 panels to size (sides, back and top). Using some Distress Oxides, I started to layer the colour and added some detail with Distress Inks and Tim Holtz Stencils. I also added some subtle painted flowers with a beige colour and a JOFY stencil. Once the background was started, I used a stronger colour (Forest Moss Distress Ink) to stencil some PaperArtsy leafy stems. 
Now to add the focal points - the JOFY flowers. I stamped each flower into the position I wanted on my panels. I then stamped parts of them again onto book paper and painted card. After cutting all my pieces out I assembled them and adhered to the backgrounds. Where there were some 'odd' spaces, I stamped some more flowers, leaves or drew in some leaves etc.
On the back panel I painted some card, stamped some more flowers onto this and arranged in one corner. I then used the word 'Bloom' from a JOFY stencil, stencilled in black to create a shadow and then stencilled over it with Fushia Sparkle Medium. To make the paint work 'less perfect' I applied some Silver Alchemy Wax randomly all over the project with my finger.


The only problem is...I need another rack now for all the new colours coming out!

Martina
xxx


Saturday, 7 October 2017

Paint Fusion Fushias - An Altered Stickles Rack


Hello crafty friends!

A journey into a 'brave new world' for me today, by request of my daughter! I received some of Sheena's amazing Paint Fusion Stamps as a present, but I have been a little scared of doing much with them...
Ages ago Adele bought a Clevercut rack to hold loads of Stickles, but apart from being assembled, it remained in its bare state staring at me. I was just going to paint it plainly to get it done, but Adele decided she wanted me to use some Paint Fusion flowers on it (no pressure then!!)

Anyway, here are my first efforts, not perfect at all, but I am working on it! I really need to get the hang of the veins, but I think I need a smaller brush for that. The good thing is that the back panel is screwed to the wall anyway and you can't really see the sides once it's up! I know it's there though and Adele was happy with my efforts, so that's all that matters.


Thank you for looking!
P.S. the front section had no room for flowers - only the Stickles with the distressed paint look in between!
xx 

Wednesday, 2 August 2017

Rare Oddities - Graphic 45 Papers to make an Ink Storage Solution


Good evening crafters! As promised, I am back with another crafty storage make for my 'organised' craft room.
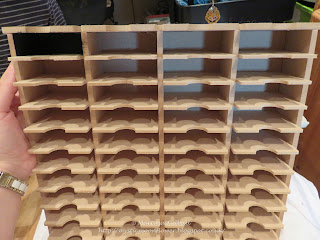
This unit is designed by Stamps Away (or 'Clevercut) and is meant for small square inks (Versacolor etc). The unit comes flat-packed and is easily assembled with strong PVA glue to secure. Once dry I always fill the 'joins' with decorators' filler and sand the excess off ( I like the surfaces to be smooth). With a perfect base created, I painted the whole unit using DecoArt Chalky Finish Paint in Remembrance. This does take a while, but only one coat is needed, as the DecoArt Paint is fabulous to use.


To smarten up the trays (yes I know the inks will hide most of it!) I added some Imagination Craft's Starlight Wax to 'distress' it and then used lots of little Lavinia and Cardio Stamps in each of the cavities. The final touch was a light spray with gold Crafter's Companion Sparkle and Shine.


I also added some wax to the edges of the unit and the inside.


I did not want to make the outside of the unit too 3D, but it was a perfect excuse to use some of my gorgeous Graphic 45 Rare Oddities Papers! (that way I can always look at them and also not give them away!) I finished the edges with some purple braid from my stash.


Here is the finished unit! All ready to go and in use already.
Thank you for reading,
Love
Martina
xxx


Saturday, 15 July 2017

Crafty Storage - An Altered MDF Ink Rack in a Worn/Vintage Style


Hello all! I have recently decided to organise, de-clutter and re-design my craftroom of late, so I thought I would do a few experiments along the way! Now I warn you perfection-mad, symmetrical, pansies all in a row, matching-type people out there, that by experiments I mean 'decorating things all differently' and totally to MY TASTE! Oh dear I hear my friends sigh...

So, my first project - an MDF Distress Ink Storage Rack by Stamps Away/Clevercut (they have made some amazing storage solutions of late, so you may see a few popping up here and there!!) For this project I was inspired by Andy Skinner's techniques (what a legend!) and one of the gorgeous stencils by PaperArtsy. I wanted to create a vintage rack, which may have been used in a gardening capacity at one time, but is now a bit worse for wear. See what you think...(all comments/feedback/criticism and suggestions are very welcome!).

Step one: follow the instructions to turn your pile of MDF into the rack itself, making sure you don't groan at all the fiddly painting that you know is coming!


Next, I painted the entire rack with a coat of Relic Americana Décor Chalk Paint and let this completely dry. I then used patches of DecoArt Weathered Wood Medium all over the unit, including some on the ink storage sections. I did not want it all to be weathered, just parts that I thought would have been, if it had been stored and a bit battered! (please excuse the lighting in my photo below, I tend to craft very late at night, but you can see the patches of Weathered Wood at least!)


Once the medium was dry (I left it to dry naturally) I was ready for my top paint layer. I used Americana Décor Chalky Finish Paint in Lace, covering each section quickly and with one stroke of my brush. If I missed a bit, I tried to leave it alone, as messing with the paint once the Weathered Wood Medium has started to do its work creates a horrid lumpy disaster! In the pictures below you can see the cracks appearing...love it!


Now that all the preparation work was done, it was time for the fun bit: decoration! Whilst having a look around one of favourite craft shops, (That's Crafty!, in Essex) I found two beautiful PaperArtsy stencils that were perfect for this piece (named 049 and 050). Both stencils have some fantastic decoration elements on them, which are usable for any projects and not just upcyling or gardening themes! Using some more Relic paint, I lightly stippled through the stencils, trying not to be too perfect. For the large Dahlias, I added a pale wash of some pink paint from my stash, just to give a touch of faded colour.


My next stage was to add a wash of DecoArt Fluid Acrylics in Transparent Yellow Iron Oxide over the areas to be the 'most worn' . To darken this still, I added some Quinacridone Gold. 


There we have it, my finished rack! Not perfect, I need some practise I know, but it will do for my purpose! I suppose most of it will be hidden anyway, but I know what's on it at least...
One problem...now I am collecting the Oxides, I am going to need another one! Damn!


That's it for now, thank you for reading!
Love
Martina
xxx


Thursday, 13 July 2017

A Pretty MDF Piece: Flowers, Rice Paper and Transfers

Good morning all! How are you doing today? Made any crafty things lately? I am in the middle of the busiest months of the year for cards, with tonnes of birthdays and events to make for...oh dear! As my daughter said to me "I have high expectations mum, you always make a better card each year" NO PRESSURE THEN!!!

Aside from those projects, I have also made the MDF piece below, which is shown today over on the Lisa. B. Designs Blog. Pop over and take a peek for a step-by-step guide!


    Love
Martina
xxx

Wednesday, 12 July 2017

Christmas in the Summer with Imagination Crafts

Before I start, I hear the groans....it's that word....Christmas. Now I have a quick question...do any of you crafters actually start making your Christmas cards this early? I know we are supposed to get organised, but do any of us actually do this? I have never managed it so far! This year however, I knew I would have to make some projects early, as Imagination Crafts sent me a box of goodies to make samples with for the Hochanda Christmas week. Here are the projects that I made, in case you managed to get hold of the some of the products before they flew out of the door!!!


That's it for Christmas at present, back to normal now!

See you soon
Love
Martina
xxx


Thursday, 29 June 2017

That's Crafty! MDF meets PaperArtsy - 2 Favourites Together!

Hello all! Today I have a blog post on the Lisa B. Designs page featuring the MDF upright project below. Please pop over and let me know what you think (good or bad!). Thank you!


Love
Martina
xxx

Thursday, 22 June 2017

A Rebellious Hare: MDF Altered Art with PaperArtsy Products

Good morning all!

I have a post over on the Lisa B. Designs Blog today, taking you through how I created the MDF upright tag below. Pop over to take a peek and find a full product list!

Thank you,
Martina
xxx
Thursday, 15 June 2017

A Crafty MDF Project to Inspire!

Good afternoon all! 
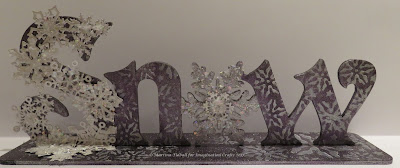
I have a post over on the Lisa B. Designs Blog today, this time making a project to be used as an 'inspiration' piece in my crafty space. I have used lots of my favourite products onto an MDF upright from That's Crafty! and created the finished piece below. Please pop over to the blog to see the full product list and a 'how-to'!


Lots of love
Martina
xxx

Monday, 27 February 2017

An Imagination Crafts Nautical Crate: Rice Papers, Starlights and Wax


Good morning all!
I have a step-by-step tutorial today over on the Imagination Crafts Blog, showing how I made the crate below. This was made for a Hochanda programme showcasing Starlight Waxes, (which sold out at the time!) but there are some left on the Imagination Crafts Website if you're quick!


Thank you for visiting - see you soon!
Love
Martina
xxx

Tuesday, 14 February 2017

Imagination Crafts Starlight Waxes: A Garden Plaque

Good morning all!
I have a tutorial over on the Imagination Crafts Blog today, explaining step-by-step how I have made the plaque below. I have used the stunning new Starlight Waxes along with other products, bringing together the old and the new for a Springtime make!


Thank you for visiting!

Thursday, 5 January 2017

Thursday, 22 December 2016

Sparkly Santa is on his Way!

A post using Imagination Crafts Starlights Paints and Sparkle Medium from me today, over on the Lisa B. Design's Blog. Here's a quick peek of one of the steps ...Click HERE to see the full 'how-to'!


Thursday, 15 December 2016

Christmas Sparkle and Starlight...


A focus on the simple and sparkly from me today, over on the Lisa B. Design's Blog. Here is a peak at one of the stages; click HERE to see the completed card and full step-by-step!


Thursday, 1 December 2016

A Christmas Plaque with some Furry Friends!

I have made a word plaque this week over on the Lisa B. Design's Blog, using Imagination Crafts products and Hobby Art characters. Here is a sneak peek, but click HERE to see the full post and 'how-to'!


Powered By Blogger