Saturday, 17 February 2018

A Scrapmetal Book Box - A Class with Andy Skinner


Hello all!


I was lucky enough to take part in a class with Andy Skinner held at the Artistic Stamper last week, and made one of the 'Scrapmetal Book Boxes'.

The Tando kit comes as a wooden book box and then a packet with the greyboard extras inside for you to customise. Each piece was decorated with Decoart Products and different stamps from Andy's ranges with Stampendous, as well as his recent releases from the Illusionary Artists range.

Here are some of the photos from the day, but I won't share all the secrets - you will

have to go to one of Andy's classes, or try his fantastic online workshops!


Saturday, 10 February 2018

A JOFY Inspired MDF Ink Rack - Funky Flowers in Bloom!

Good morning all!

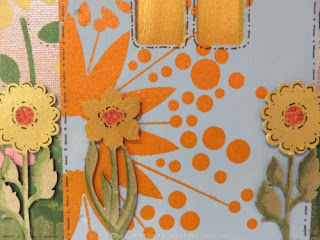
I am finally getting around to decorating some of the MDF storage dotted around my room, and with my latest ink rack I decided to go 'JOFY'. 

The basic rack is from Clevercut (Stamps Away) and came flat-packed. I assembled the rack and then base coated the edges with some pale blue paint. I then took a large sheet of watercolour card and measured 4 panels to size (sides, back and top). Using some Distress Oxides, I started to layer the colour and added some detail with Distress Inks and Tim Holtz Stencils. I also added some subtle painted flowers with a beige colour and a JOFY stencil. Once the background was started, I used a stronger colour (Forest Moss Distress Ink) to stencil some PaperArtsy leafy stems. 
Now to add the focal points - the JOFY flowers. I stamped each flower into the position I wanted on my panels. I then stamped parts of them again onto book paper and painted card. After cutting all my pieces out I assembled them and adhered to the backgrounds. Where there were some 'odd' spaces, I stamped some more flowers, leaves or drew in some leaves etc.
On the back panel I painted some card, stamped some more flowers onto this and arranged in one corner. I then used the word 'Bloom' from a JOFY stencil, stencilled in black to create a shadow and then stencilled over it with Fushia Sparkle Medium. To make the paint work 'less perfect' I applied some Silver Alchemy Wax randomly all over the project with my finger.


The only problem is...I need another rack now for all the new colours coming out!

Martina
xxx


Saturday, 2 December 2017

Christmas Houses


Hello all!

Christmas is fast approaching...I am SO not organised! To be honest I have been busy making things for other people and not for myself; I always seem to think I have loads more time than I actually do!
Here is an MDF piece I was pleased with, made for a recent Imagination Craft's Hochanda show. It started life as plain MDF before being transformed!
The MDF was basecoated with white Gesso before I applied random thicknesses of Crackle Paste to add texture. Once dry I also stencilled a few bricks to some sections with the same paste to add another layer of interest. I used a wash of Chestnut Starlight Paint to age the houses and give some shading, making it darker or lighter as appropriate. The branches and birds are greyboard Magi-Cutz painted with Starlights and the rest are odd bits from my stash! Voila!


I think I may need to make another one for myself now!
xx

Saturday, 25 November 2017

Mixed Media Fun - Starlights and Rice Paper Galore with Imagination Crafts!

Hello crafty friends!

Here's another post for fans of Imagination Craft's products, showing how I used some of their latest releases in the November mixed media show aired on Hochanda this month. I had great fun mixing up themes for the show, using a mix of Crackle Paste, canvases, MDF, paints and stencils! My desk was every colour under the sun and some very weird combinations of products I can tell you! Hey ho, that's how you experiment I suppose...

Here is a canvas that I made using some of the MDF houses as embellishments, along with greyboard flowers and a host of other things!
The flowers in the background have been created with some Imagination Craft's stencils and different colours of chalk paint. The chalk paint was used so that there would be a contrast between the beautiful Starlight Paint background and it would not all get lost in amongst each other. The houses have been painted with chalk paint and then stencilled onto. The bricks were created with another stencil and some Crackle Paste to add texture. Once the paste was dry I went over the bricks with a wash of Chestnut Starlights to make the cracks 'pop'. The stars and starburst on the house were stencilled with Starlights. To create a shadow behind the words they were stencilled twice - the second time around moving it slightly before applying Blackcurrant Sparkle Medium (my FAVOURITE!!)


Along with the canvas, I also created a decorated MDF Clock. My version did not have a mechanism in it, (although you can use these) it was purely for decorative purposes.


The 'clock face' is part of one of the gorgeous Rice Paper designs featured in the show and the embellishments, butterflies and leaves were from the packs of greyboard shapes (Magi-Cutz/Art-Cutz). I also used parts of the Rice Paper to decorate the edge and base of the clock, tying it all together by using Starlight Paint in tones of colours taken from the Rice Paper images. The flowers were from my stash, but I edged the petals in the same paint colours to make them shine and coordinate with the whole piece.


Thanks for reading and I will see you soon!


Saturday, 18 November 2017

Imagination Craft's Rice Paper and Upcycled Glass

Hello there!

This is a post for all you Imagination Craft's fans, featuring some of the samples I made for the latest Hochanda show this month. The show focussed on mixed media and Rice Papers (until they rapidly sold out that is!!). My first set of samples looked at the use of the Rice Papers onto glass, with a touch of Starlight Paint to add some shimmer. This technique is great for upcycling old pieces of plain glass, or even random ornaments, (I raided the charity shop) but is also great if you like buying plain bits of cheap glass (think pound shop) and then making them into beautiful gifts.


My basic technique was to choose a main colour and then a Rice Paper design that would accentuate that (or the other way around if preferred!).  I used a wet paintbrush to moisten areas of the Rice Paper that I wanted to feature and then very gently tore around these areas to release them. Applying decoupage glue to inside of the glass item and the back of the Rice Paper, I placed into position. Once all the areas had been decorated I then gave a final glue coat all over to seal. To add colour inside and behind the Rice Paper (making it pop) I painted with Starlight Paint.


Where it was very tricky to paint inside an item (small pots) I  applied a coat of decoupage glue to the glass to create a 'key' and then covered with my choice of Starlight Paint afterwards. I attached the Rice Paper on top of this.

Once I started to play with glass and all the different ways to apply decoration, there was no limit! I applied Crackle Paste, Alchemy Wax, painted inside and out and attached embellishments to my heart's content!
Thanks for reading - see you soon!

Saturday, 7 October 2017

Paint Fusion Fushias - An Altered Stickles Rack


Hello crafty friends!

A journey into a 'brave new world' for me today, by request of my daughter! I received some of Sheena's amazing Paint Fusion Stamps as a present, but I have been a little scared of doing much with them...
Ages ago Adele bought a Clevercut rack to hold loads of Stickles, but apart from being assembled, it remained in its bare state staring at me. I was just going to paint it plainly to get it done, but Adele decided she wanted me to use some Paint Fusion flowers on it (no pressure then!!)

Anyway, here are my first efforts, not perfect at all, but I am working on it! I really need to get the hang of the veins, but I think I need a smaller brush for that. The good thing is that the back panel is screwed to the wall anyway and you can't really see the sides once it's up! I know it's there though and Adele was happy with my efforts, so that's all that matters.


Thank you for looking!
P.S. the front section had no room for flowers - only the Stickles with the distressed paint look in between!
xx 

Thursday, 28 September 2017

An Embossed Sparkly Wreath Card

Good morning ladies and gents! I nearly October...oh my gosh!! I have the last of my Christmas Wreath makes over on the Lisa B. Designs Blog today, it is a very simple card to do, so please pop over to the blog to find out more!

Love
Martina
xx

Thursday, 21 September 2017

A Beaded Wreath Card

Good morning all! This week over on the Lisa B. Designs Blog I have a tutorial showing how I made the card below using the Nellie Snellen Christmas Wreath Stamp with beads. This is my favourite card I made with the stamps! Please pop over to the blog for a 'how to' guide!


Love 
Martina
xxx

Thursday, 14 September 2017

A Christmas Wreath Card, or 4?

Good morning all!

The Autumn chill is in the air for the school runs, but the sun is shining, so it's all good! I have a card over on the Lisa B. Designs Blog today, using the Nellie Snellen Wreath Stamp. If you would like to see more detail on how it was made, please pop over!


Love
Martina
xxxx
P.S. If anyone is going to the Ally Pally show on Saturday - I will see you  there!!

Thursday, 7 September 2017

A Christmas Wreath Card with a Sepia Twist

Good morning all! It feels like Autumn here, even though I know it is technically not yet! With Christmas fast approaching, it was time to start some card making in the Lisa B. Designs classes, so this month I am working with a Nellie Snellen Wreath Stamp. If you would like to see how the card below came about, please visit me over on Lisa's Blog!


Love
Martina
xxx

Powered By Blogger